Oh boy, I think I spoke too soon last time we talked when I said that stage 2 of the HNG Internship was challenging. Stage 3 puts the C in challenging by upping the difficulty level by a solid amount of points. So was it so bad?
Well, it wasn’t bad, the added pressure definitely did make some shine while others probably gave up at this point if they hadn’t in stage 2. So what did we have to do for stage 3 of the HNG Internship, let’s take a look.
HNG Internship Stage 3 Tasks
1. Clone the HNGFun repository
So stage 2 almost made this task as easy as ABC, after going through real-world GIT usage, by the time that stage 3 came you were at least familiar with how things worked. However, this is where all the familiarity ends as you get thrust into the deep end of the swimming pool.
2. Run localhost web server and log in to PHPMyAdmin
Even though in stage 1 you got a glimpse of how to run a web server either using docker or some other web server software like XAMPP, it’s a whole different ball game to start working with PHPMyAdmin.
Most websites online have a database that they use to store information and PHPMyAdmin is the portal to which one can manage databases for websites running on their local web server. So quite a fair amount of research has to be done here for this task so you’d be able to tackle the next few tasks.
3. Create a new database called hng_fun using PHPMyAdmin
4. Import hng_fun.sql file into your newly created database
One of the files that you get when you clone the HNGFun repository is called hng_fun.sql and it has some instructions that will add the required tables to your empty database. Importing this via PHPMyAdmin will result in your database having two tables one called interns_data and another called secret_word.
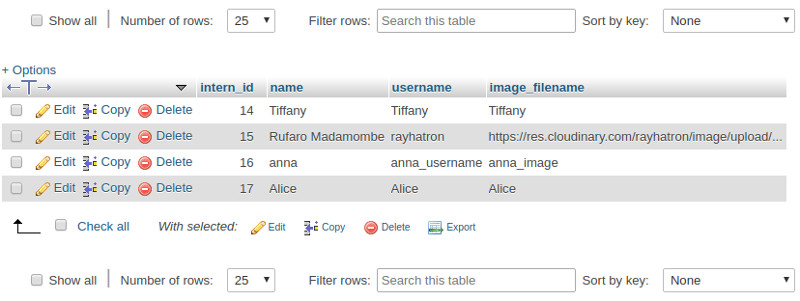
The interns_data table will contain 4 columns:
- intern_id - an auto-incrementing number
- name - your full name
- username - the username that you’re using on slack
- image_filename - a URL to your profile image stored on Cloudinary
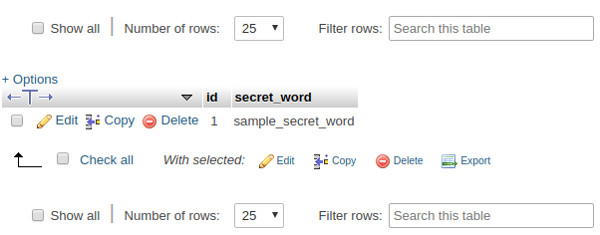
On the other hand, the secret_word table will have 2 columns: id and secret_word.
5. Insert dummy data into the database
At this point, it’s great that the database now has tables and some structure to it but it is still an empty canvas and it’s time to paint on it.
Here, you have to enter data into the corresponding columns of the interns_data table using PHPMyAdmin. You’ll not enter anything for the id column as it automatically increments whenever new data is added in the other columns.
You’ll also not enter any data into the secret_word table as it already contains one row which contains the secret_word and it is to only have that row.
In the end, your interns_data table should look something like:

While your secret_word table looks like:

6. Create a username.php file in profiles/ folder
Once all the database setup has been completed, it is time to actually use that data to get your profile to display on a page. The first step is to create a file called username.php where you replace username with your slack username.
7. Get the secret_word from the database
Remember that data that you added to the database? Well, it’s time to get it from the database and use it. All this will be done in your username.php file.
For your profile to be visible, you have to get the secret_word from the database and store it in a variable called
$secret_word
Another file called profile.php which displays your profile will need to verify that your profile does have the secret_word stored in that variable so it can display it successfully. Think of it as a password.
If it’s your first time working with SQL and PHP then this will undoubtedly be a little bit nerve wrecking as you’ll not be sure where to start. Fortunately, in profile.php file this exact task is already accomplished so you could take a look at how it’s done there. However, be warned, don’t just copy the code without truly understanding what is happening as it will come and bite you in the next task.
8. Use PHP to display your name, username and image_file data from the database
If you’ve successfully retrieved the secret_word from the database and understand what exactly is happening then this should be as easy as just repeating what you did previously and changing the names of the variables where you are storing the information.
After getting the information into appropriate variables, you now have to use them to build out your profile page. Remember in stage 1 you had to implement a page that showed the time using PHP somewhere?
Well, the same thing is going to happen here, you’ll essentially build an HTML page then use PHP to output the data you got from the database in the places you would have chosen. In case you’re wondering where to place the data well, now would be a good time to get back to your trusty design friend Figma and create a design for your profile page.
9. Go to hng.fun/admin.php and fill in your details in the form
Assuming that your design is now complete and you’ve built it you should then use the GIT skills you got in stage 2 to commit and push your changes to the repository.
Then once your code is on the repository, you should head over to hng.fun/admin.php so that you enter your details using the form on that page so that they are added to the database of the live site.
Hopefully, the details you used to fill out your local intern_data are the same ones so you’ll just copy those and paste them into the form.
Now, depending on how the auto deployment of the site is behaving, the form might complain that it can’t locate your username.php file, however, if you pushed it to the repository then it’s just a matter of waiting for auto deploy to work its magic and get your code registered on the server. So you might need to retry a couple of times before it accepts your data.
10. Ask a mentor to review
Once your data has been accepted by the form, visit https://hng.fun/profile.php?id=username to view your profile. Make sure to substitute username with your slack username which should be the same that you used to name your username.php file.
If everything is working as it was on your local web server then it’s time to locate a mentor in slack and let them know that you’ve conquered stage 3.
My Experience With Stage 3 Of The HNG Internship 2018
Stage 3 definitely exposed my weakness a bit. Shocking as it sounds, so far in my career as a web developer, I have not worked with SQL that much. The last time I can remember that I had written an SQL statement was when I was working on an android app that needed to store some data in a database for login purposes but that’s prior to me becoming a web developer.
Imagine that, a web developer who is baffled by SQL queries is like a builder being baffled by how to mix cement. It’s such a fundamental thing to web development yet it’s possible to go a long time without doing it if it’s taken care of by someone else.
Due to that, stage 3 to me was challenging as I hinted to earlier. I had to confront my weaknesses and learn how to actually talk to a database in order to get information from it.
Apart from that, most of the tasks involved things that I had already done before like setting up a local web server, creating databases in PHPMyAdmin, hosting pictures on Cloudinary and working with GIT so in the same breathe, stage 3 was also not that challenging.
I’m starting to see the value in taking part in such a remote internship early on in your career as it forces you to learn the basics well and at the same time pushes you work like you’re already in the real world.
Oh, yes time for the big reveal. Click the following link to see what my profile page for HNG Internship stage 3 ended up looking like.
Tweet me @Rayhatron with your thoughts about stage 3 of the HNG Internship. Are you familiar with some of the tasks that had to be completed? How do you think you would have done?